

Photography Blog & Technical Insights
Tutorials, Field Notes & Visual Experiments
Welcome to my blog… a space where I share in-depth photography tutorials, behind-the-scenes field guides, and personal reflections on the craft. From planning wide-field astrophotography shoots and capturing celestial events like supermoons and meteor showers, to exploring post-processing techniques, archival photo restoration, and the evolving role of AI in creative workflows, you’ll find practical guides and visual case studies here.

Supermoon Photography in Qatar: Best Doha Locations & Guide
Learn how to shoot the supermoon from Qatar with this comprehensive guide. I share proven locations across the Qatari desert—from Zekreet Peninsula to Khor Al Adaid—plus PhotoPills settings, optimal azimuth angles, and technical tips for capturing the moon rising over Doha's skyline or the endless sand. Perfect for every supermoon event, year after year.
Originally published for the April 2020 supermoon. All locations, PhotoPills techniques, and shooting tips remain 100% valid for every supermoon event in Qatar—updated August 2026.
How to shoot the supermoon from Qatar, a question I get asked every single time the lunar calendar brings this spectacular event to our skies. As an architectural and fine art photographer based in Doha, I have chased supermoons across the Qatari desert for years. The challenge is real: light pollution, horizon obstructions, and finding that perfect foreground to frame our celestial neighbor. But with the right planning, and PhotoPills in your pocket, you can capture a supermoon shot that rivals anything from the world's best astrophotographers. (If you are new to night sky photography, start with my guide on how to find the Milky Way with your smartphone; it covers the same planning principles.) In this guide, I will take you to my personal shooting locations across Qatar, share exact coordinates, and break down the technical settings you need. Whether you are a beginner or a seasoned pro, these spots work for every supermoon event, not just one.
When and Where to Look
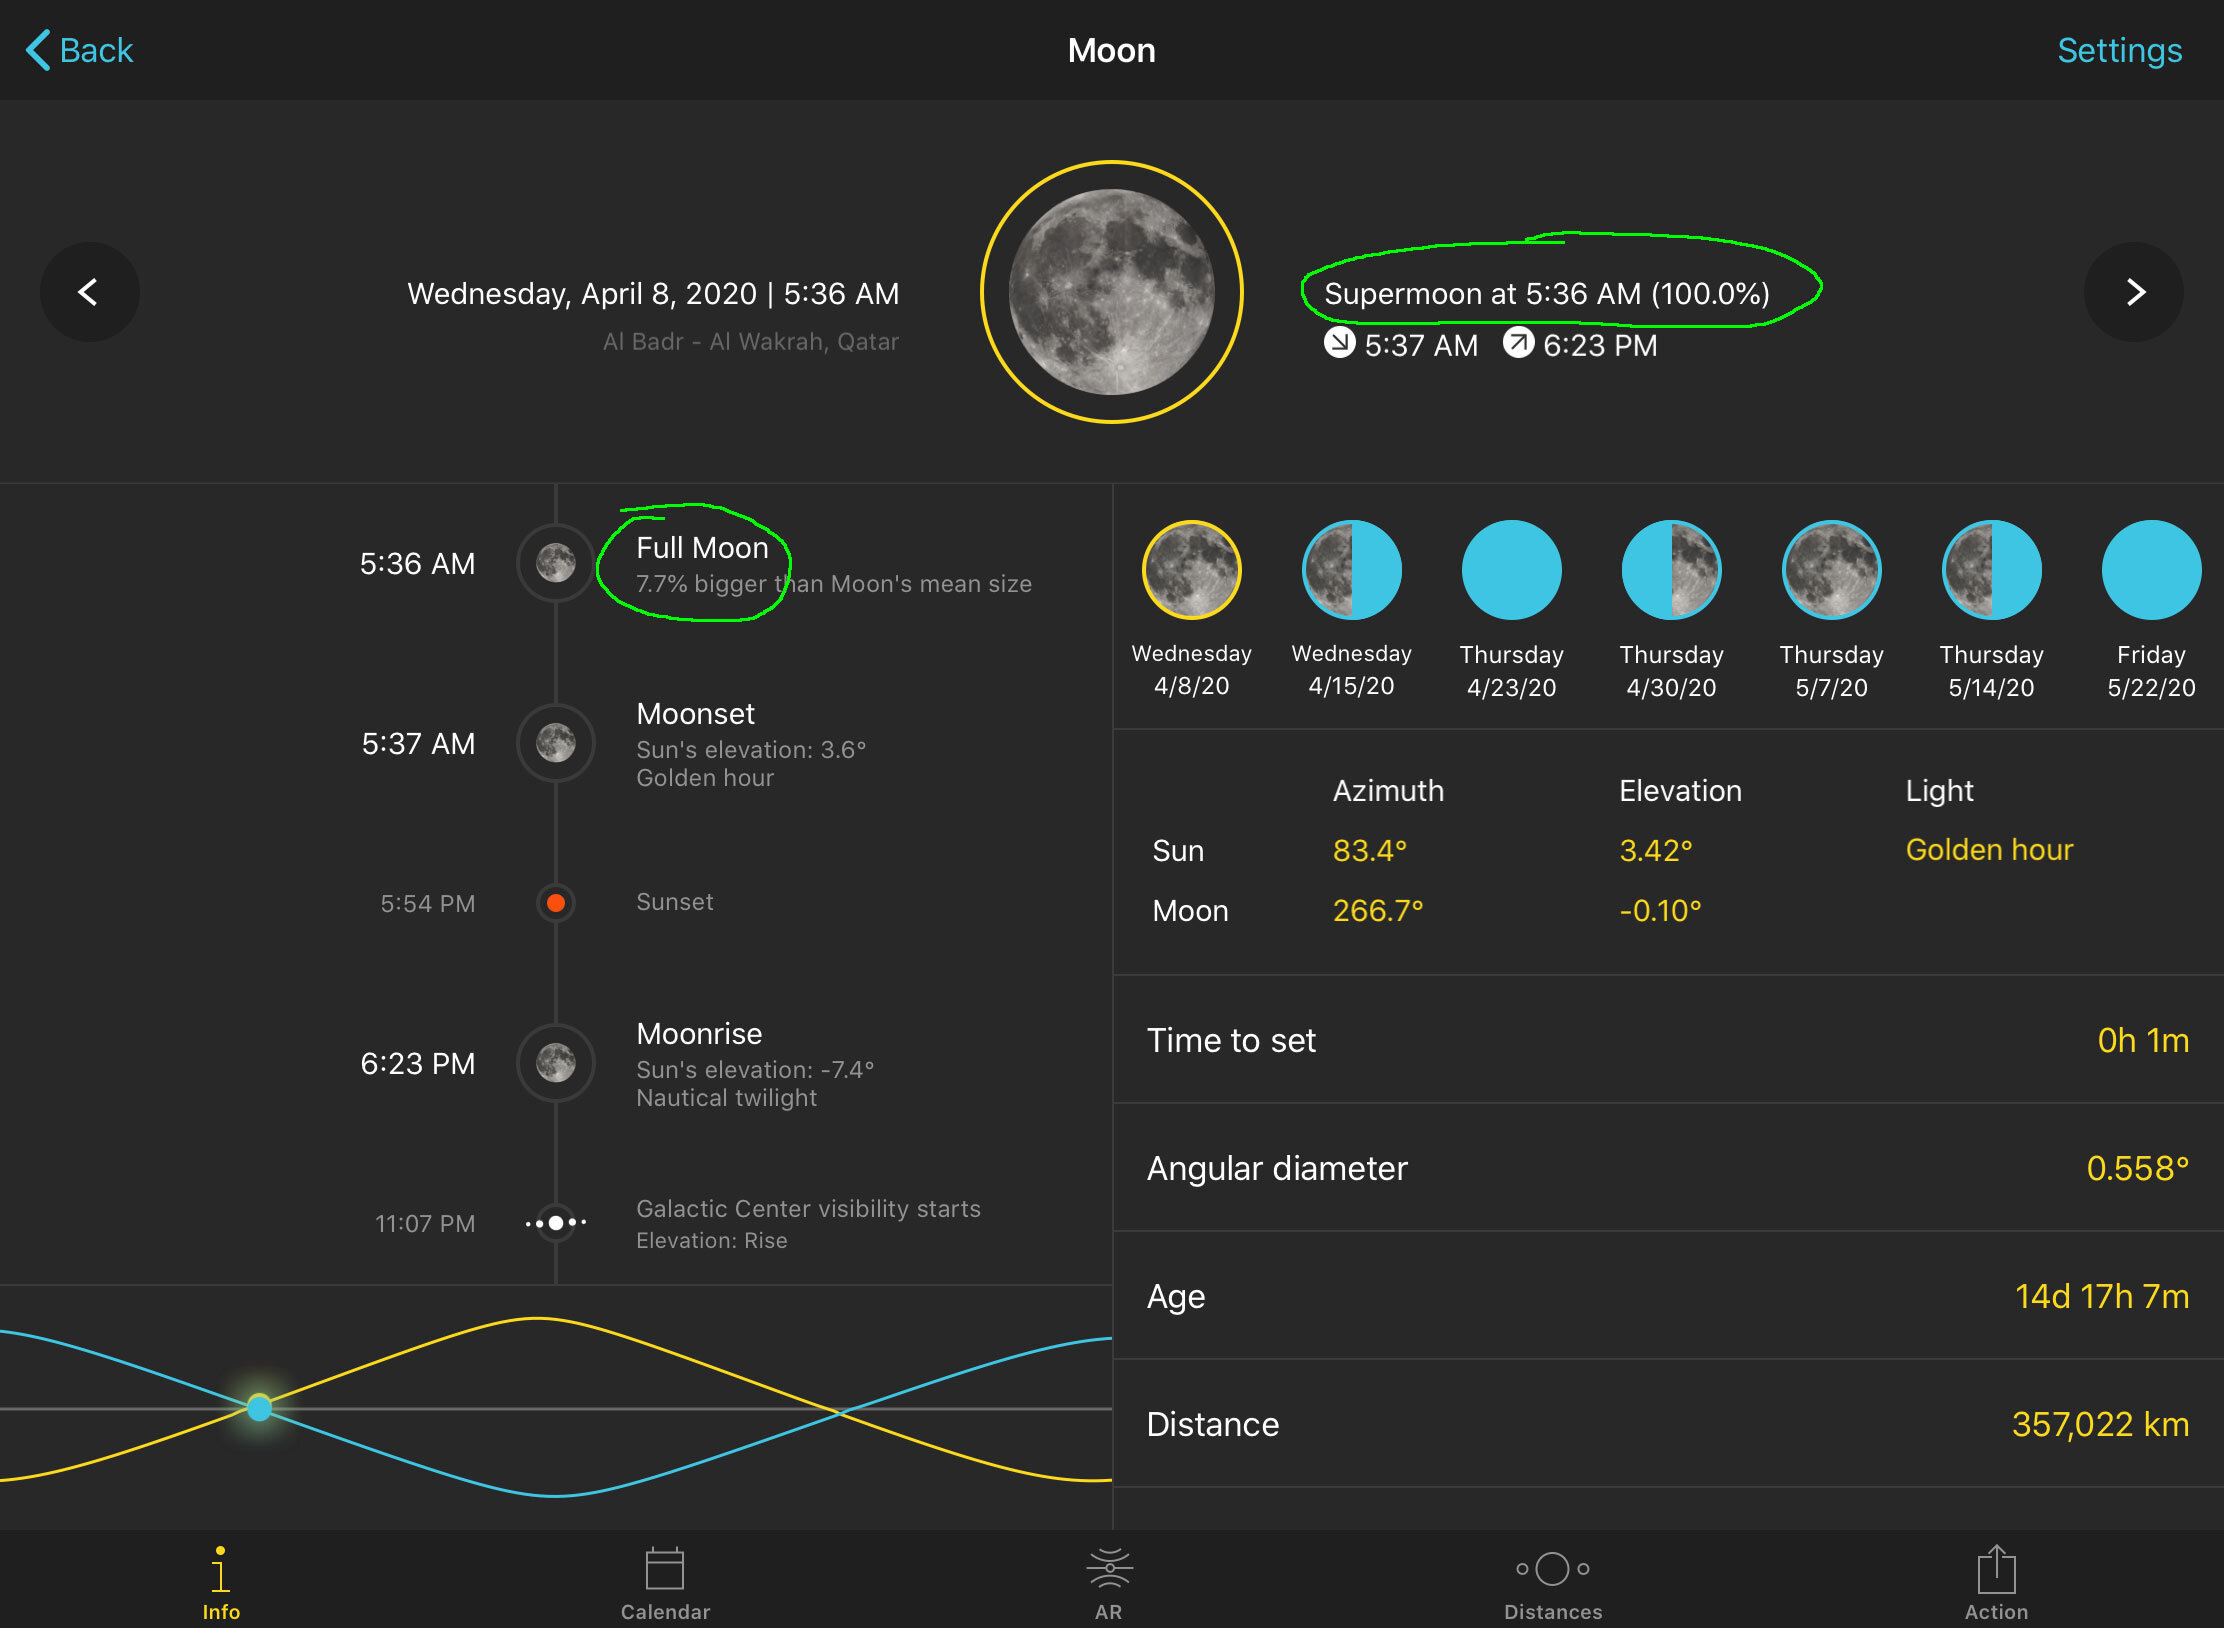
The supermoon will reach its peak size at 5:37 am local time or 02:36 GMT. Ironically 5:37 am is also the time of moonset so citizens of Doha won't be able to experience the phenomenon in its entirety. Well, don't be sad because there is nothing "super" about the full moon. In reality, the size difference is only 7.7% bigger compared to the average full moon on regular days of the year.As you can see from the above snapshot of Photopills, the peak time of the supermoon is the same as its setting time, which poses a question: "how would I be able to see it when it's setting?" The answer to the question is simple. Just shoot it a few minutes before it sets and you should still be ok. My suggestion is to capture the moon between 4:30 am to 5:15 am, if you have an obstructed view of the horizon. For those lucky ones among you who have a clear view of the horizon in the direction of the moonset, you may continue to capture the moon until it sets which is at 5:37 am.The direction you should be facing is West South West, or to keep things simple, just look toward the West.
Best Viewing Spots in Qatar
Since the direction of the moonset is towards the West, the best spots for viewing it will be from the areas located to the west side of the peninsula.
Umm Bab Beach
One of the best spots to see an unobstructed view of the supermoon as it sets. By chance, if you happen to live nearby, grab your gear and be there while making sure you adhere to the social distancing guidelines.
Dukhan Public Beach
Another beach that is located around the west coast should offer the same quality of experience as Umm Bab. Again, if you live in Dukhan, you have this rare chance of capturing something unique considering the circumstances.
Other spots located around the Western part of Qatar
There are many other potential locations to view and capture supermoon, all of those located on the west side. Some of them are Zekreet, Mystery Village, White Sand Beach, Galactic Core Bay, Zubarah Fort, Zubarah Town ruins, Al Jemail Fishermen’s village, etc.
Huge Bonus - Calculated spots for the best Supermoon shot
Let's say you get an opportunity to head out, here are two properly calculated spots to get a great composition against the supermoon.
Plan 1: Progression of the setting Supermoon against the minaret of the Grand Mosque
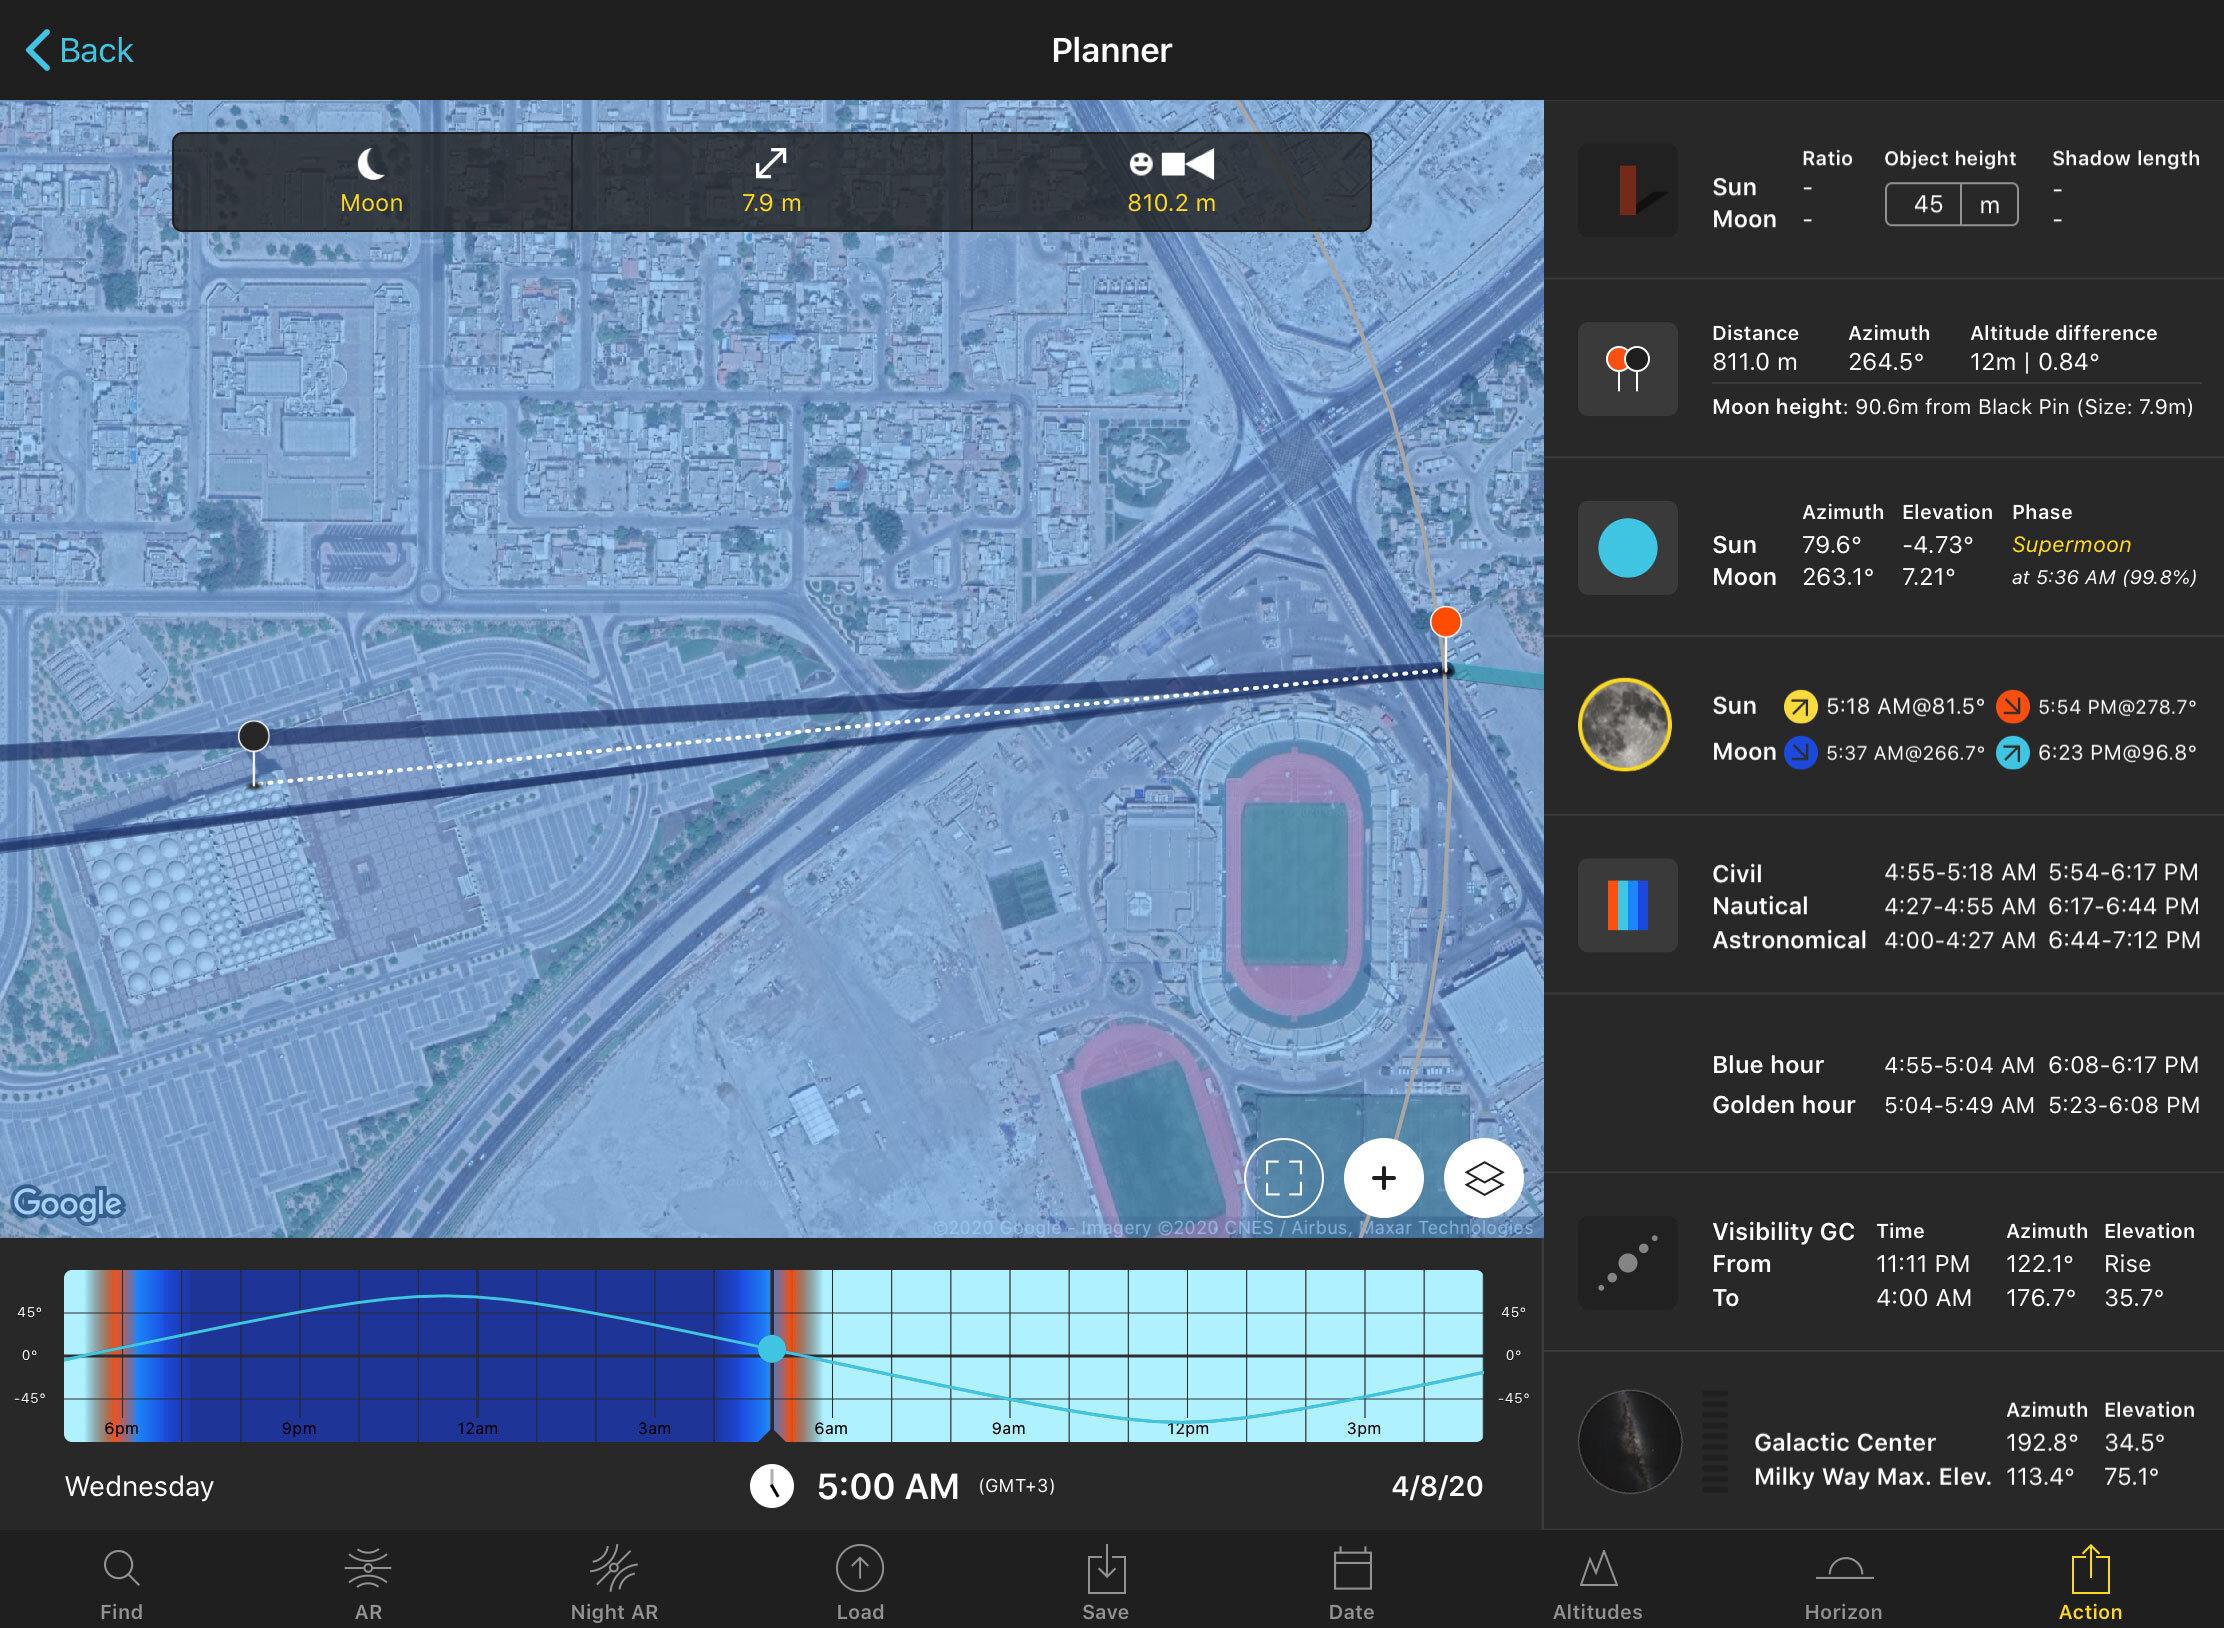
Get a 500mm (full-frame equivalent) lens, and be at the following spot. If you rotate the camera to portrait orientation, you should get a diagonal field of view of 4.95 degrees which gives you a frame that is 39m in width by 58m in height. The minaret is between 40m to 45m in height so you'll still have plenty of space in the frame to capture the path of the setting supermoon. Make sure to start shooting at 5:00 am (or as early as you see the moon in your frame) and continue to do so every 2-3 minutes until the moon is no longer visible in the frame. The exact spot where you should set up your camera is below: Below is a snapshot of the plan from the PhotoPills app so you can be sure that everything is properly calculated to get the shot right.If you are an advanced user of PhotoPills, you can learn a lot from the above screenshot. But even if you can't, don't worry. I have done the hard work for you. Just be there and get it done. Before moving to the next one, here are the settings checklist:
Focal length: 500mm
Orientation: Portrait
Aperture: f/8
ISO: 100 should be fine (increase it if you feel you have to)
Vibration reduction: Must be turned on
Shutter speed: faster the better to avoid shake. Make sure to trigger the shutter remotely or use time delay aka self-timer to keep the vibrations away.
Shooting format: RAW
What if you only have 200mm: Keep all settings the same but start shooting at around 4:40 am (or as soon as you have the moon visible in your frame) and keep shooting until the moon is no longer visible in the frame.
Plan 2: Progression of the setting Supermoon against the Torch Hotel
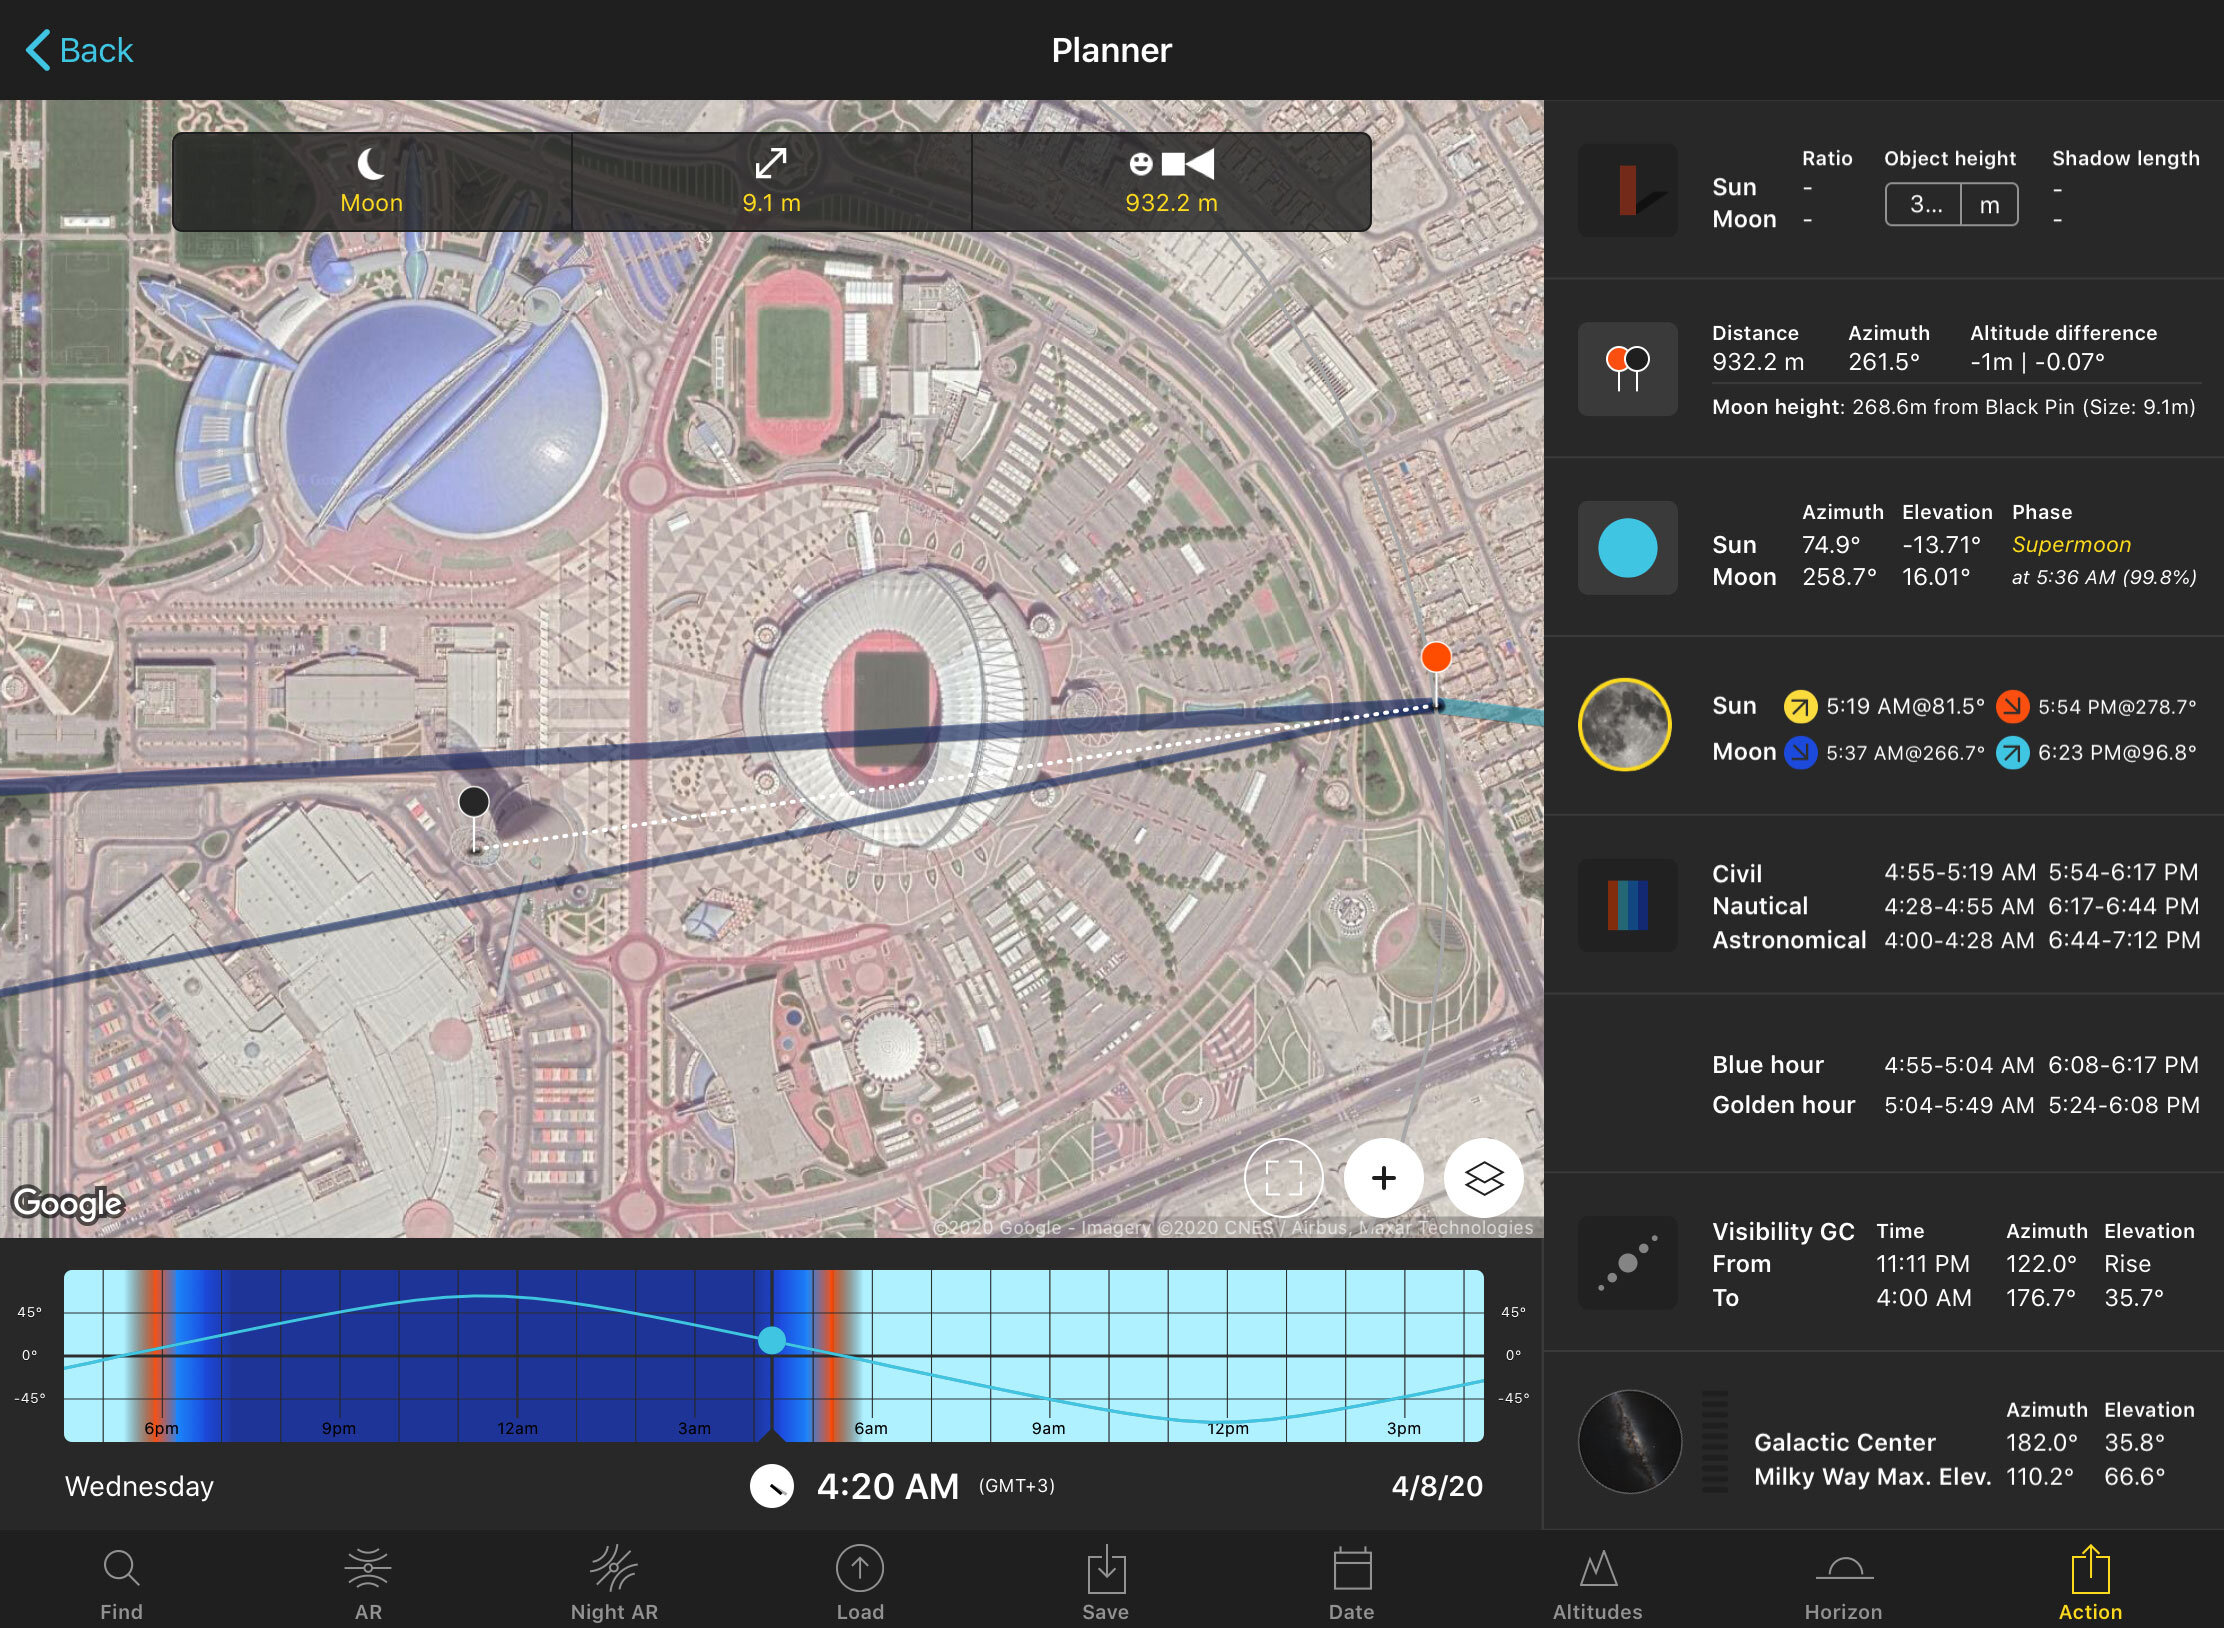
Dealing with the Torch Hotel is a bit easier because as per this plan, you don't need a lens above 200mm. In fact, the plan is calculated with a 200mm (full-frame equivalent) in mind. Why? It's because the Torch Hotel is a much bigger subject, and because the shooting spot is not at a long distance from the subject. Here is the set-up spot:And here is a snapshot of the plan from the PhotoPills app. Once again, it's all calculated and ready to be executed.As per the calculation, you would be able to start shooting from 4:20 am (or early if you can see the moon in the frame), and continue taking a shot every 2 - 3 minutes till the moon is no longer visible. That should give you a nice progression of the setting supermoon in a slight curve. Please note that your frame could be partially obstructed by the giant canopy of the Khalifa Int'l Stadium but since the Torch Hotel stands at 300m in height, you should still be able to see a good part of it against the supermoon.Let's wrap it up with the settings:
Focal length: 200mm
Orientation: Portrait
Aperture: f/8
ISO: 100 should be fine (increase it if you feel you have to)
Vibration reduction: Must be turned on
Shutter speed: faster the better to avoid shake. Make sure to trigger the shutter remotely or use time delay aka self-timer to keep the vibrations away.
Shooting format: RAW
If all else fails…
If all else fails, perhaps you cannot make the drive out to Zekreet or Khor Al Adaid, there is still hope. Rooftop access within Doha can work, provided your building faces the correct azimuth and you have an unobstructed view of the southeastern horizon. A window will do in a pinch, but remember: glass distorts, and buildings block. My honest advice? Make the drive. The desert offers darkness, silence, and a foreground that tells the story of Qatar's vast landscape beneath the moon. Every supermoon is a chance to refine your craft. Study the azimuth, check your PhotoPills planner, arrive early, and shoot generous. And when you capture that perfect frame, tag me, I genuinely love seeing Qatar's night sky through your lens. Now get out there (safely) and shoot.
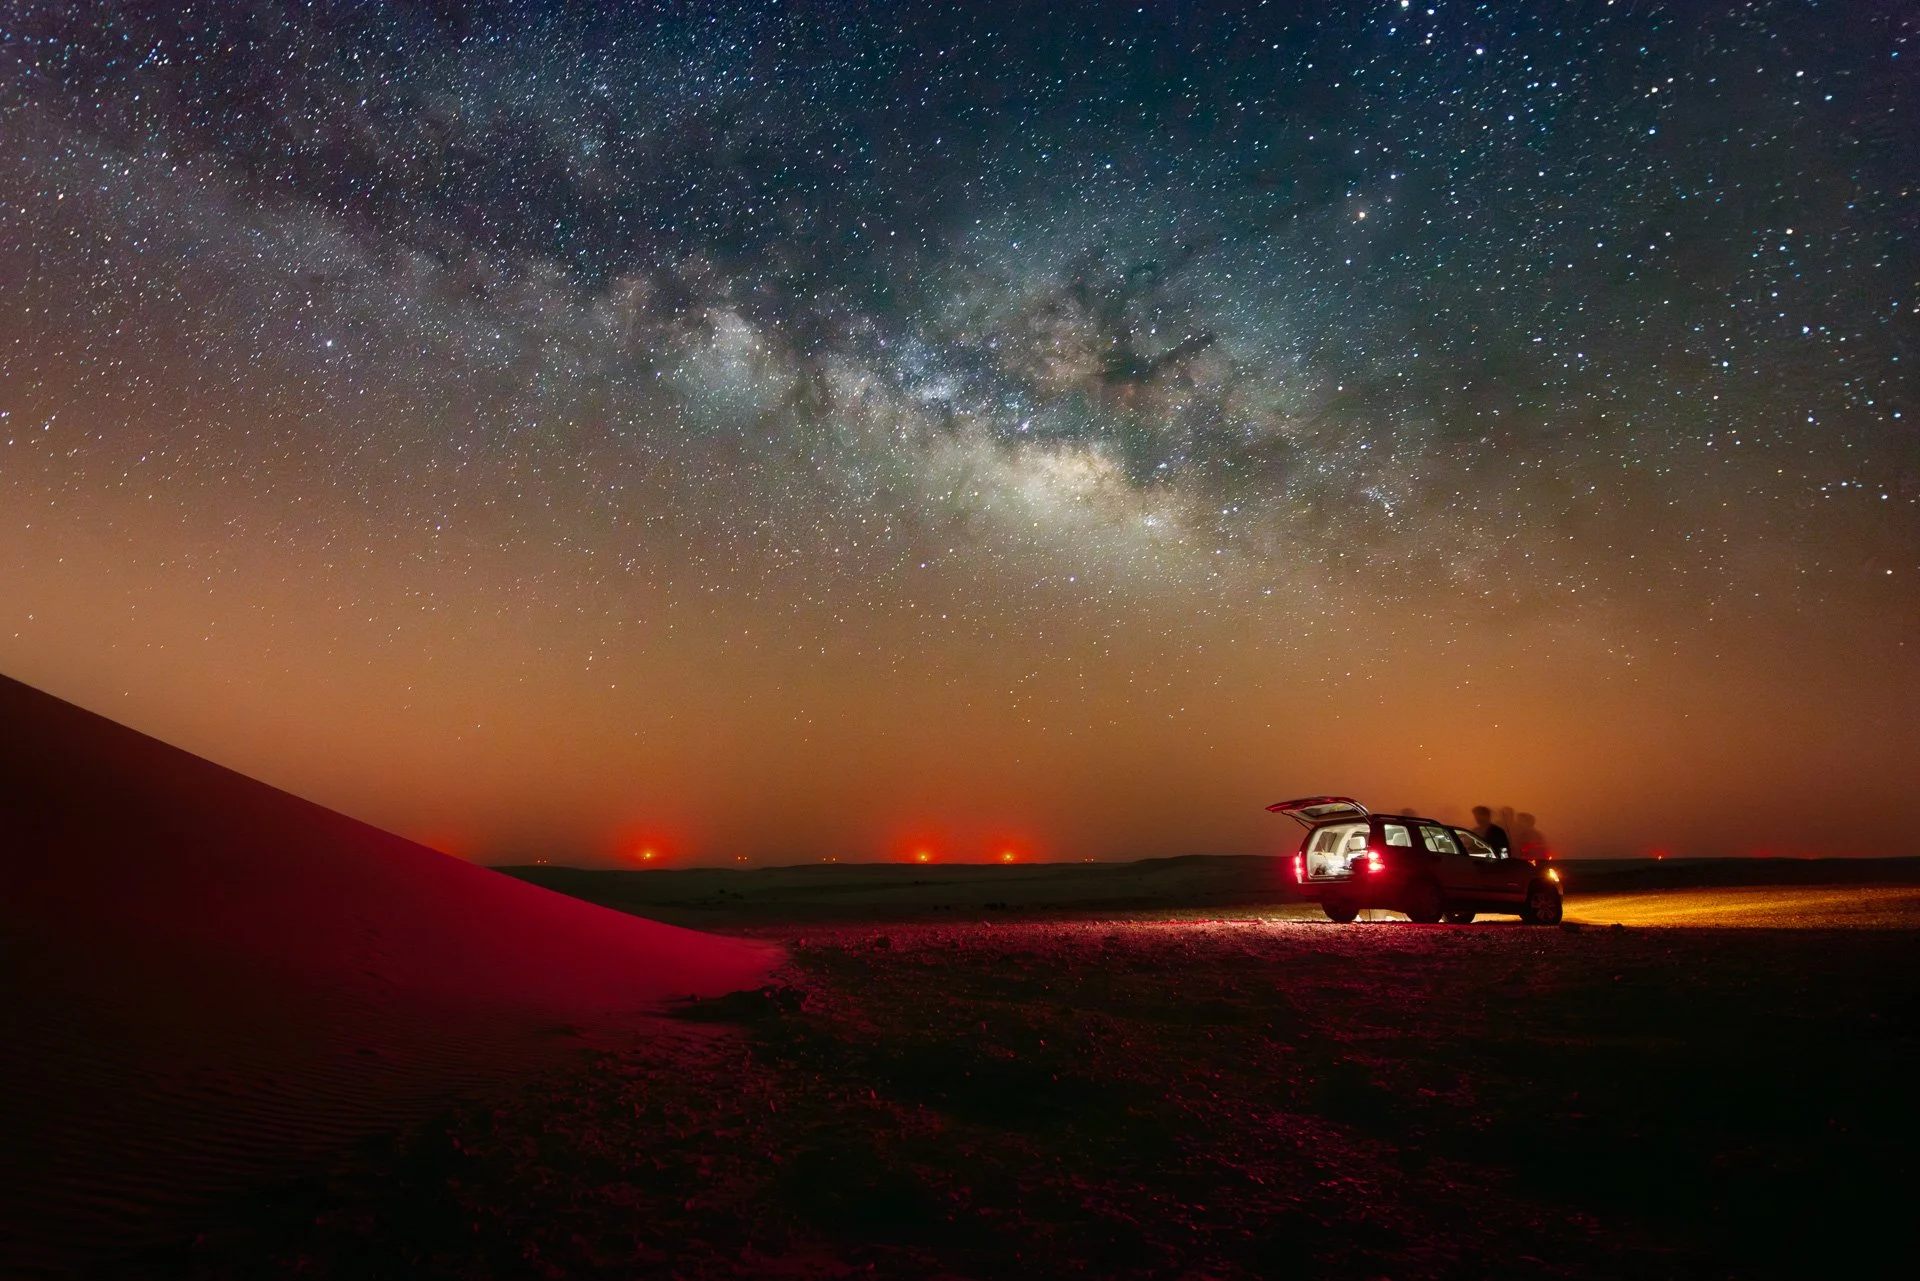
How to find the Milky Way with a Smartphone… right here in Qatar.
Want to photograph the Milky Way with your smartphone in Qatar? This tutorial uses PhotoPills to reveal exactly when and where to go—from Doha's light-polluted skyline to the dark deserts of Zekreet and Khor Al Adaid. Learn the timings, the coordinates, and the best months to capture the galactic core over the Qatari desert. No telescope. Just your phone and a clear night.
As an architectural and fine art photographer based in Doha, I know the challenge all too well: our city's dazzling skyline comes at a cost. Light pollution swallows the stars. But within a 90-minute drive from West Bay, toward the Zekreet Peninsula or the remote expanse of Khor Al Adaid, the sky transforms into something ancient and profound. In this tutorial, I will use PhotoPills to show you exactly how to locate the Milky Way's galactic core, no matter where you are. But since you are reading this in Qatar, I will also tell you exactly which desert coordinates to punch in.
Milky Way App - PhotoPills (iOS| Android)
I have suggested PhotoPills numerous times to fellow photographers and my students in the past. And even though, this app is pretty advanced and feature-rich and comes at a steep price of $9.99, it is THE ONE app you need on your smartphone. You will not regret buying it once you learn how to use it. I have included the links for iOS and Android versions in the title above.
Step 1: The Planner

PhotoPills home page
Open the app and you should see the following home page. Tap on the "Planner" option.
Step 2: Galactic Center

Photopills Planner

Tap on the little image of the Milky Way
Tap + Swipe left on the highlighted area (see the below picture) till you see the "Galactic Center" option. You will also notice a small image of the Milky Way inside a circle all the way to the left.
Once you are there tap on the little image of the Milky Way as shown below.
As soon as you tap the Milky Way image, the app will take you to the next best date for Milky Way. The visibility indicator graph next to the Milky Way image should show all bars in cyan. Make note of the date which is shown at the bottom right. Check out the video below to see the whole process.
Notice the dots along a circle that appears when you tap + slide the timeline at the bottom. Those dots represent the farthest visible edges of the Milky Way. The slightly bigger dot, which is at the center indicates the galactic core. Now based on this visual information, you can easily locate the direction of the Milky Way from your geographic location. In addition, accurate times for the rising of the Milky Way, its elevation, etc. are accessible from other tabs that are located at the top. Just swipe left or right to get to the desired information tab.
PhotoPills Official User Guide
If you have downloaded PhotoPills already, I would strongly suggest that you spend some time going through its features. For a detailed guide on all its features, check out the link below.http://www.photopills.com/user-guide
Find Your Milky Way
The Milky Way is no doubt an intriguing subject. It has captured the imagination of artists, scientists, and dreamers around the world. But unfortunately, it is fading from our skies, thanks to increasing light pollution in and around major cities. Here in Qatar, your best window is between March and October, when the core rises high enough above the southern horizon. My personal recommendation? Head to the desert tracks past Al Shahaniya, away from the Doha glow, and set up between 2:00 AM and 4:00 AM during a new moon. Get it while you still can. And if you capture something remarkable, tag me; I would love to see Qatar's night sky through your lens. I hope this article helps you find the Milky Way, wherever you are on the planet, but especially if you are right here in the desert with me.